


Introduction to Weekend Backyard Makeovers
Benefits of a DIY Fire Pit
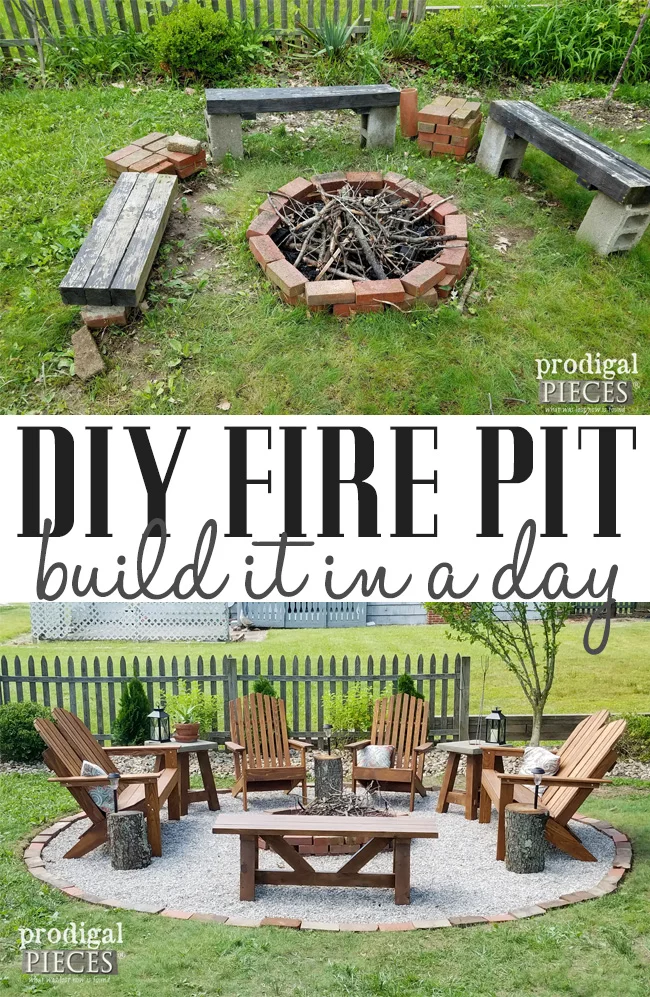
Imagine welcoming friends over on a crisp weekend evening, gathering around a warm, crackling fire in your own backyard. A DIY fire pit not only transforms your outdoor space into a cozy retreat but also creates a natural gathering spot for conversations, roasting marshmallows, and making lasting memories. Beyond the ambiance, building a fire pit yourself offers a rewarding sense of accomplishment and a personalized feature tailored to your style and needs. Plus, it’s an affordable project that boosts your home’s value while encouraging more time outdoors.

Overview of Budget-Friendly Materials
When it comes to constructing a fire pit without splurging, budget-friendly materials are abundant and surprisingly effective. Many homeowners have used items like repurposed bricks, salvaged concrete blocks, or even old garden pond liners to keep costs low. For instance, a stainless steel washing machine drum is a fantastic choice for a small yard, offering excellent heat resistance and airflow at a minimal cost. By thinking creatively and sourcing materials wisely, you can achieve a rustic, durable fire pit without compromising quality or safety.
Planning Your Fire Pit Project
Choosing the Right Location in Your Backyard
Before you grab your tools, take a stroll through your backyard and envision where your fire pit would best fit. Consider proximity to your house, existing landscaping, and the direction the prevailing winds blow. A spot away from fences, overhanging trees, or anything flammable is essential. Jane, a weekend warrior from Ohio, chose a corner that received good airflow and was visible from her kitchen window, allowing her to keep an eye on the fire while cooking indoors. Marking out the exact spot with garden stakes and twine helped her visualize the size and shape before the actual build began.
Watch the Tutorial
Design Considerations for Safety and Aesthetics
Safety should always guide your design decisions. A common mistake is ignoring ground leveling, which can lead to water pooling or unstable seating areas. Taking time to accurately mark your fire pit’s dimensions with spray paint ensures a well-sized and evenly built structure. For aesthetics, think about matching the fire pit’s style with your backyard’s overall vibe. Curved benches work well in small spaces, lending a welcoming feel, while a classic brick circle complements traditional gardens. Fire pit rings can simplify construction and provide a finished look that’s both functional and beautiful.
Gathering Materials Without Breaking the Bank
Recycled and Low-Cost Material Options
One practical way to stay on budget is to tap into recycled materials. Old red bricks, usually costing around 75 cents each, are sturdy and add a charming rustic look. If you have access to leftover landscaping fabric, that can serve as an effective barrier between soil and gravel. Those who live near repair shops or renovation sites might find stainless steel washing machine drums, which are perfect for small fire pits due to their heat resistance and ventilation qualities. Keeping an eye on Craigslist or local freecycling spots can also provide free sod or bricks, helping you avoid waste and reduce your project’s cost.
Where to Source Affordable Supplies
Besides scavenging leftovers, local garden centers and hardware stores often offer deals on bulk materials like #8 limestone gravel, essential for proper drainage beneath the fire pit. Renting a gas-powered sod cutter will speed the removal of grass if you’re working with limited time, and coordinating with helpers makes the job more manageable. For specialized items like fire pits rings, check online marketplaces or home improvement stores where beginner-friendly kits are frequently sold at reasonable prices.
Step-by-Step DIY Fire Pit Construction
Preparing the Area and Foundation
Starting with a well-prepared foundation is key to a safe, long-lasting fire pit. Clear the chosen area by carefully removing sod through wedge-shaped cuts, rolling it up for reuse or easy giveaway. It’s a smart idea to post excess sod on free sections of Craigslist to keep your yard tidy. After removing the grass, mark the fire pit’s center and radius using a garden stake and twine to create a perfect circle. Spray paint helps outline the pit and the optional fire ring, providing a clear guide for the next steps. Laying down landscaping fabric, overlapping edges by at least four inches, will prevent weed growth and keep your base stable.
Building the Fire Pit Structure
Once the base is ready, begin stacking your bricks or blocks, placing them slightly higher than the grass level to account for eventual settling and to minimize trip hazards. Arranging the bricks uniformly, often dry-stacking or using a simple adhesive, helps build a sturdy enclosure. Incorporating a steel fire ring can secure the structure and shield the bricks from excessive heat, increasing durability. This stage benefits greatly from teamwork; coordinating with friends or family can speed up brick laying and ensure a steady project pace.
Finishing Touches for Durability
After construction, consider adding a fire-resistant coating to any repurposed vessels or materials that might not have inherent fireproof qualities. This extra step extends the life of your fire pit and boosts safety. Inspect the ground around the pit, ensuring it is level and free of trip hazards before adding seating. Lastly, clean off any dust or dirt from the bricks and gravel to enhance the pit’s appearance and prepare it for its first fire.
Enhancing Your Backyard Ambiance
Adding Seating and Décor Elements
Your fire pit deserves a welcoming perimeter. Adding matching seating, like wooden benches or stone blocks, creates an inviting circle that encourages lingering. Combining these with cozy blankets and cushions turns chilly evenings into snug gatherings. For small yards, choose curved benches to maintain a smooth flow, avoiding cramped spaces. Adding potted plants or lanterns nearby can bring subtle charm without cluttering the area, making your backyard an extension of your living room.
Lighting Tips for Evening Use
While the fire provides natural light, soft supplementary lighting enhances safety and ambiance. Solar-powered garden lights or string lights hung around the seating area create a warm glow without extensive wiring. If you’re hosting late into the night, consider battery-operated candles or LED lanterns, which bring extra charm without the fire risk. Reusing old jars as candle holders adds a personal, rustic touch that complements the DIY aesthetic.
Maintaining Your Fire Pit
Safety Guidelines and Regular Maintenance
Regular inspection is crucial to safe fire pit use. Remove ash and debris after each use to prevent buildup, which can affect airflow and create hazards. Always ensure surrounding materials remain non-flammable and free of overgrown vegetation, which is a common oversight leading to accidents. Basic maintenance like checking the stability of bricks or rings helps prolong your pit’s life. Practicing safe fire habits, including having a water source nearby and not leaving the fire unattended, protects both your home and guests.
Seasonal Care Tips
As seasons change, prepare your fire pit accordingly. During wet months, covering the pit with a sturdy, weatherproof cover prevents water damage and rust. In colder climates, clearing snow promptly preserves the foundation and prevents freeze-thaw damage. Some DIY enthusiasts apply a fresh coat of fire-resistant sealant annually to keep the structure robust. Taking these simple steps ensures your fire pit remains a backyard centerpiece year-round, ready for spontaneous weekend gatherings or planned celebrations.


