


Introduction to Air Fryer Chicken Breasts
Why Choose Air Fryer for Cooking Chicken?
Imagine preparing a quick dinner after a long day at work—no oil splatters, no hot oven preheating, just fast and efficient cooking. That’s the magic of an air fryer when it comes to chicken breasts. Unlike traditional frying or baking, the air fryer circulates hot air around the chicken, creating a crispy outside while locking in moisture. This method is not only healthier due to minimal oil use, but it also speeds up the cooking process, making it a favorite among busy home cooks.
Benefits of Juicy Chicken Breasts
There’s nothing more disappointing than biting into dry, rubbery chicken breasts. Juicy chicken makes every meal memorable, whether you’re serving family or guests. Properly cooked air fryer chicken breasts offer a tender, moist bite with a lightly crisp exterior, perfect for enhancing simple weeknight dishes or impressing at meal prep. Achieving that juiciness means preserving the natural moisture and cooking at just the right temperature—which this guide will walk you through, ensuring you enjoy chicken at its best.
Essential Tools and Ingredients
Air Fryer Models and Sizes
Choosing the right air fryer model is crucial, especially for beginners. Smaller baskets are perfect for single servings or couples, but they can overcrowd quickly when cooking multiple chicken breasts, affecting airflow and crispness. Larger models provide more space but may require longer preheating times. For instance, a 5.8-quart air fryer can comfortably fit two to three chicken breasts without overcrowding, allowing even air circulation and consistent cooking results.
Must-Have Ingredients for Flavorful Chicken
Beyond the chicken breasts themselves, a few key ingredients transform your meal. Olive oil acts as a binder for spices and keeps the chicken moist during cooking. Salt is essential—not just any salt, but finely ground table salt like Morton, which coats the chicken evenly and enhances flavor. A simple spice blend combining smoked paprika, garlic powder, black pepper, and a pinch of brown sugar creates a balance of smoky, savory, and subtle sweetness. These everyday pantry staples combine to make your chicken breasts pop with flavor.
Preparing Chicken Breasts for Air Frying
Selecting the Right Chicken Breast
Quality matters. When shopping, look for chicken breasts that are fresh, firm, and evenly shaped. Uniform thickness ensures even cooking—pounding thicker pieces to an even thickness or slicing into cutlets can drastically reduce cooking time and prevent the dreaded dry edges. Avoid chicken breasts with excess moisture or water added, as this can dilute seasoning and affect the texture.
Prepping Techniques: Trimming, Marinating, and Seasoning
Once you bring the chicken home, trim any excess fat or silver skin for a cleaner bite. Pat the breasts dry with paper towels to remove excess moisture; this step helps achieve a crispy crust. Marinating is a game-changer—soaking the chicken in a simple brine solution or a mixture of olive oil and spices for 30 minutes to an hour allows flavors to deeply penetrate while keeping the meat moist. If you’re short on time, a quick rub of olive oil and seasoning just before cooking works well, too.
Step-By-Step Cooking Instructions
Setting Up Your Air Fryer
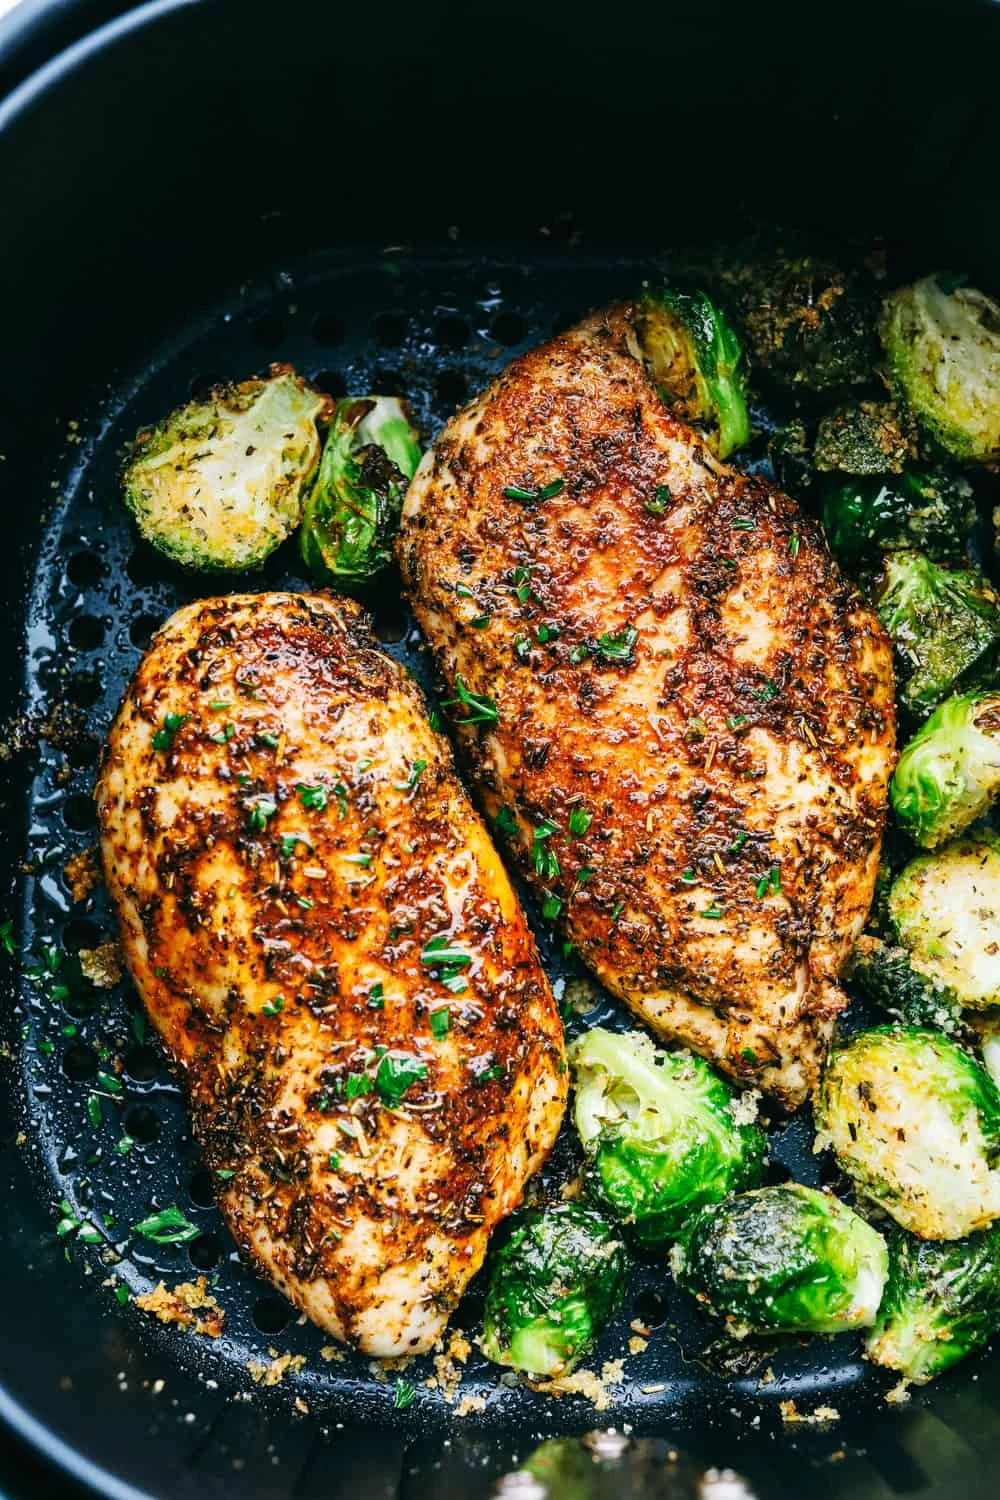
Begin by preheating your air fryer to 360°F, a lower temperature than traditional oven cooking, which suits the convection heat method. Lightly brush the basket with oil or use a perforated parchment liner to prevent sticking. Arrange the chicken breasts in a single layer without overcrowding to allow the hot air to flow freely around them, essential for even cooking and browning.
Cooking Time and Temperature Guide
For average-sized chicken breasts (around 6 ounces each), cook at 360°F for 18 to 20 minutes. Flip halfway through the cooking time to promote uniform browning. If your chicken breasts are thicker or cut differently, adjust timing accordingly—thinner cutlets may only need 12 to 15 minutes. Using a meat thermometer, check for an internal temperature of 160°F before removing, as carryover cooking will raise it to the safe 165°F after resting.
Flipping and Monitoring During Cooking
Flipping the chicken halfway is crucial. This simple action ensures each side receives direct heat, preventing uneven cooking. Around the 10-minute mark, peek inside the air fryer to monitor progress; if you notice rapid browning, reduce the temperature slightly. Some models cook hotter than others, so familiarizing yourself with your specific air fryer helps prevent burning or drying out the chicken.
Tips for Ensuring Juicy and Tender Results
Resting Time and Slicing Techniques
One of the most overlooked steps is allowing the chicken to rest after cooking. Resting for 5 to 7 minutes lets the juices redistribute throughout the meat, rather than escaping the moment you slice. Slice the chicken against the grain to shorten the muscle fibers—this technique leads to a more tender bite. A sharp knife and deliberate slicing turn your air-fried chicken from good to restaurant-quality.
Common Mistakes to Avoid
Beginners often overcrowd the air fryer basket, causing steam to build up, which steams rather than crisps the chicken. Avoid this by leaving space between pieces. Rushing to slice the chicken immediately after cooking lets precious juices escape, drying out the meat. Lastly, under-seasoning or skipping the olive oil step results in bland, tough chicken. Following these simple precautions ensures juicy, flavorful results every time.
Creative Variations and Serving Suggestions
Flavor Marinade Ideas
Once comfortable with the basics, experiment with global flavors. A spice rub with cumin, coriander, and turmeric brings Middle Eastern warmth, while a mix of chili powder, lime zest, and garlic powder adds a zesty Mexican twist. For a Korean-inspired kick, toss cooked chicken with a house-made gochujang dipping sauce that balances sweet, spicy, and savory notes perfectly. These variations allow you to tailor your chicken breasts to any cuisine or craving.
Healthy Side Dishes to Pair
Air fryer chicken breasts lend themselves well to a variety of healthy sides. Pairing with a fresh salad loaded with mixed greens, cherry tomatoes, and avocado offers a light, nutritious meal. Roasted sweet potatoes or quinoa provide complex carbohydrates and texture contrast. Stir fry seasoned vegetables or a light pasta with olive oil and herbs complement the chicken without overpowering its flavor. These sides keep your meals balanced and satisfying.
Troubleshooting Air Fryer Chicken Breasts
Dry or Overcooked Chicken Fixes
If your chicken turns out dry, consider brining next time to improve moisture retention. Reduce cooking time slightly and check the internal temperature earlier to prevent overcooking. Adding a light brush of olive oil before air frying also helps lock in juiciness. If you’re left with dry chicken after cooking, shredding it and mixing with a flavorful sauce can salvage the dish, making it perfect for wraps or salads.
Uneven Cooking Solutions
Unevenly cooked chicken often results from uneven thickness or overcrowding in the air fryer basket. To fix this, pound breasts to an even thickness or slice into cutlets to ensure uniform heat penetration. Avoid piling pieces on top of each other and flip the chicken halfway through cooking to distribute heat evenly. If your air fryer has a rotisserie or basket function that tumbles food, consider using it for more consistent results.


