


Preparation Before Starting Your Hardwood Floor Refinishing Project
Assessing the Condition of Your Hardwood Floors
Imagine stepping into your living room on a Saturday morning, ready to breathe new life into your hardwood floors. The very first step is to assess whether refinishing is even necessary. To make this practical, try the water drop test: place a few drops of water on the floor and watch closely. If the water beads up and sits on the surface, your finish is likely still intact. However, if water soaks in right away, it’s a clear sign that your floors are ready for refinishing. This simple test prevents unnecessary work and preserves your floor’s character.

Gathering Essential Tools and Materials
One weekend, a homeowner named Lisa planned to refinish her floors but learned the hard way that not reserving rental equipment early caused delays. To avoid this, book your sanding machines well in advance from a home improvement store. Essential tools include a drum sander for the main floor area, an edge sander or orbital sander for corners, painter’s tape, plastic sheeting for dust control, various sanding grits, wood stain, and finish. Don’t forget safety gear like respirators and goggles, as wood dust can be harmful. Gathering all these tools ahead is like packing your toolbox for a smooth journey.
Setting Up a Safe and Efficient Workspace
Next, clear the room completely—remove all furniture, rugs, and even baseboards. It might seem laborious, but this step prevents damage and hassle later. Label each baseboard with painter’s tape so reinstallation feels like following a map rather than a puzzle. Seal electrical outlets, vents, and doorways with painter’s tape and plastic sheeting to keep the dust contained. This setup is crucial, as hardwood floor dust can travel and settle throughout your home. Preparing your workspace with safety and efficiency in mind not only protects your belongings but also creates a calmer environment to work in.
Step-by-Step Guide to Refinishing Hardwood Floors in One Weekend
Removing Furniture and Cleaning the Surface
Recall the story of Mike, who started sanding without clearing the space, only to have dust cover his furniture hours later. Don’t repeat this mistake. Begin by removing everything from the room. Sweep or vacuum thoroughly to eliminate loose dirt that could interfere with sanding. A clean surface ensures the sanding process will be smooth and effective, resulting in a more uniform finish.
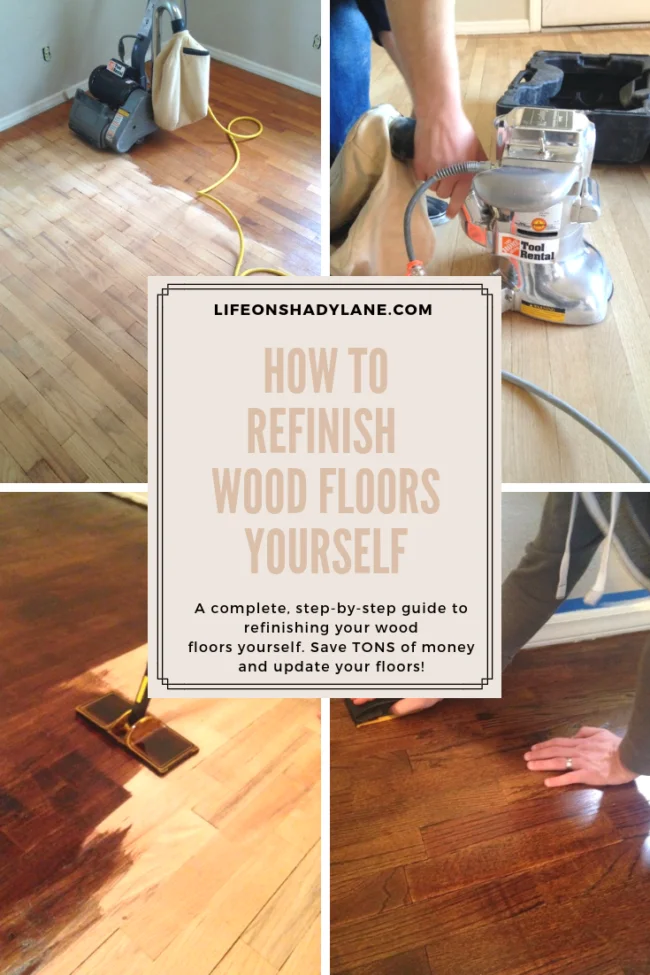
Sanding Techniques: From Coarse to Fine Grit
Sanding is the heart of refinishing and demands patience. Start with a coarse-grit sandpaper, such as 36 or 40 grit, on the drum sander. Move with the wood grain, making overlapping passes to avoid uneven spots. Resist the urge to leave the sander stationary; lingering too long can carve permanent grooves. After the initial pass, switch to finer grits, gradually moving up to around 120 grit for a smooth finish. Use an edge or orbital sander with 40-grit paper to reach corners and edges. The goal is a uniform surface color, signaling that the old finish has been completely removed and the wood is prepped for staining. Wearing a respirator and goggles during this dusty phase is essential to protect your health.
Addressing Imperfections and Repairs
Before staining, inspect your floor for imperfections. Protruding nails should be hammered down or replaced to avoid damaging sanding equipment. Fill any cracks or holes with wood filler matching your floor’s tone. For example, Sarah found a few deep scratches that blending the filler concealed perfectly, saving her floor from looking patchy after refinishing. Taking care of these details ensures a flawless surface that’ll impress visitors and last for years.
Applying Stain and Finish for Durability and Beauty
Now comes the fun part: choosing and applying your stain. Select a color that complements your room’s decor—darker stains add warmth, while lighter tones create a spacious feel. Using a clean cloth or brush, apply stain evenly along the wood grain. Allow it to penetrate according to the product’s instructions before wiping off excess. Follow up with your finish—polyurethane is a popular choice for durability. Apply thin, even coats, letting each dry thoroughly. Sarah opted for a satin finish that beautifully highlighted her oak floors while resisting everyday wear.
Drying Time and Room Ventilation Tips
Patience is key during drying. To speed things up and maintain air quality, keep windows open or use fans to circulate fresh air. Avoid rushing into furniture arrangement—you want your floors fully cured to avoid dents or smudges. Over a weekend, planning your time around these drying periods helps ensure your hard work doesn’t get undone.
Expert Tips and Tricks for a Professional-Looking Finish
Choosing the Right Stain Color and Finish Type
Picking stain and finish can be daunting. Think about your lifestyle—if you have pets or kids, a tougher finish like oil-modified polyurethane offers excellent protection. For a natural look, a water-based finish dries faster and has less odor, perfect for weekend projects in occupied homes. Sampling stains on a small hidden area helps preview the final look. Remember, the right choices balance beauty and practicality, fitting your daily life while enhancing your floor’s grain and warmth.
Common Mistakes to Avoid During Refinishing
Many tackle refinishing as a quick weekend fix and end up frustrated. Avoid common pitfalls such as starting without reserving equipment—this can stall your whole plan. Skipping preparatory steps like removing baseboards or sealing doorways unleashes wood dust throughout your house, creating a mess to clean up for weeks. Neglecting safety gear risks your health, while improper sanding techniques can leave permanent marks. Stepwise sanding from coarse to fine grit takes time but yields the smooth, professional results you want. Learning from these missteps saves both money and heartache.
Maintaining Your Hardwood Floors Post-Refinishing
Once your floors gleam with fresh finish, care is vital. Place felt pads under furniture legs to prevent scratches. Clean regularly with a damp mop and wood-floor cleaner, avoiding excessive water. Periodically inspect for wear and consider touch-up finish for high-traffic spots. This ongoing attention preserves your weekend labor, keeping your hardwood floors beautiful and resilient for years to come.


")