


")


So many of the investments that go into a house require maintenance, whether it’s ensuring that your appliances are regularly cleaned or your HVAC’S air filters get refreshed every couple of months. If you have hardwood floors at home, or are planning for their installation, the same logic applies. Over time, scuffs, discoloration and dings in the wood can develop, leaving your floors in need of a tune-up.
Fortunately, hardwood can be refinished up to 10 times over its lifespan, and if done properly, the job can last a decade. No matter if you decide to do it yourself or hire a professional, it’s best to know the basics before diving into the process. And with the right tools, all of which you can find at The Home Depot, your floors can get back to good-looking ASAP.
But first, a quick test
Make sure your floors actually need to be refinished using the (incredibly simple) water droplet test. Drip a few beads of water on the area you believe is in need of refinishing. If the water seeps into the wood, it means the wood fibers are exposed, and the floors likely does need to be refinished. If the water droplets bead up, it means your floors might just need a good clean and polish (a much simpler process!).
New England-based general contractor Joe Truini notes that stains are also a good indicator that hardwood might need to be refinished. “Wood is extremely porous, so if it’s worn, it’ll be susceptible to staining,” he says.
It goes without saying that if you perform the water droplet test and are at all unsure of the results, it’s best to call in a professional for expert advice.
Tools of the trade: Sanders and buffers
If go-time for refinishing is here — and you’re sure you feel comfortable with power tools — gather all the items you’ll need to successfully tackle the project (note: these are likely not in the average household toolbox). Review the process thoroughly, and note common mistakes ahead time, like overly-aggressive sanding.
“What you don’t want to do is wind up sanding a depression in the floor, because you can’t put the wood back,” says Truini. “There’s no real repair other than pulling up the flooring.”
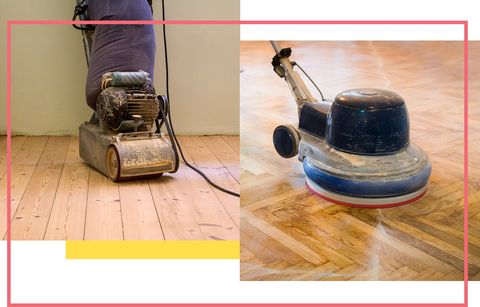
Before any sander hits the wood, you’ll want to prep the room. Completely clear out all items, clean the floors, and remove any base molding to prevent damage. While most sanders have built in dust collection systems, it’s important to seal off the room where you’ll be working using plastic and sturdy painter’s tape — this prevents dust from spreading into other areas of the house. And always wear the right kind of protective equipment, like goggles and a dust mask. (For more information on installation safety, see letter I.)

An edger sander is your best bet for rough-sanding tight spots (like corners) and smaller spaces (like a closet), while a random orbital sander is recommended for non-professionals tackling the refinishing of a larger space on their own. (Rough-sanding removes the major nicks and stains in the wood.) Belt and drum sanders are bigger and can get the job done faster, but if you are worried about wielding one, leave it to the pros instead of risking damage to the floors. For an extra polished look, pros might use a floor buffer fitted with a fine-grit screen to rough-sand floors before staining or finishing them.
All of these tools can easily be rented at The Home Depot, and likely aren’t items you’re going to want to purchase for keeps (unless you’re ready to take your refinishing show on the road).
Plan to use the edger sander and orbital sander in tandem to ensure consistency throughout the wood, working a little bit at a time with the same grade of sandpaper in both tools. (Tip: You can practice your skills ahead of time on a piece of old plywood.)
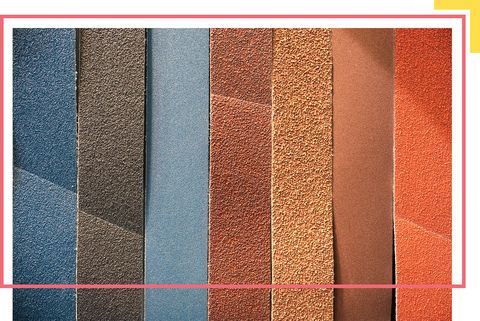
Always move from a coarser grain sandpaper (like 36 grit, which will better remove old finishes and surface stains) to a finer grain sandpaper (like 60, 80 or 100 grit) to create a smooth surface. Don’t try and speed up the process by jumping from an ultra-coarse sandpaper to something super-fine: You likely won’t be removing enough old products to prepare the floors for a new stain and/or finish. Even more so than most flooring projects, patience is critical when refinishing hardwood. After sanding, you’ll want to do another thorough clean to prevent dust from affecting your HVAC system and appliances.
Stains add style to hardwood
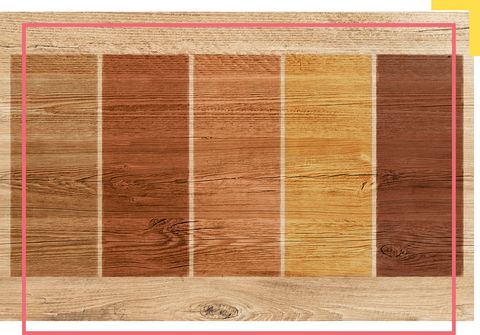
After you’ve finished sanding and dust has been properly discarded, it’s time for something with less machinery: applying stain.
Stains are applied to the floor like paint and enhance the natural beauty of the wood. Select your stain based on the type of hardwood (different woods accept stains differently!) and, of course, how you’d like the floors to appear. Lighter stains can help give the room a more airy feeling and allow the wood grain to shine through, while darker stains can make the floors the focal point of the room and add sophistication. It’s also important to keep in mind that darker stains tend to show more dirt due to the contrast between dust particles (or crumbs, or pet hair) and the wood. Working in a small area at a time (think: 3 feet x 3 feet), apply the stain with a foam applicator pad, wiping up excess stain with a rag as you go.
The finishing touch that’s a must
Once the stain dries, a hardwood flooring finish seals the deal and protects all of your hard work. Even if you choose not to stain your floors in the step above, you must finish them. (It isn’t called refinishing for nothing!)
Finishes can be water-based polyurethane (which dries quickly and relatively clear), oil-based polyurethane (which dries slower and allows for more time to complete the job, but requires a respirator while working) or wood oils (which showcase the textured grain pattern of the wood). This is easiest to do with a large roller, working from the back of the room toward an exit door so that you don’t paint yourself into a corner (literally).


