


Why Choose Clear Containers for Kitchen Cabinet Organization?
Benefits of Visibility and Accessibility
Imagine reaching into a cabinet and easily spotting the flour or sugar without rummaging through bags and boxes. Clear containers offer the invaluable advantage of visibility, allowing you to quickly identify contents at a glance. This not only speeds up meal prep but reduces the frustration of misplaced items. For example, a busy parent preparing school lunches can effortlessly grab snacks stored in transparent bins, keeping mornings smooth and efficient.
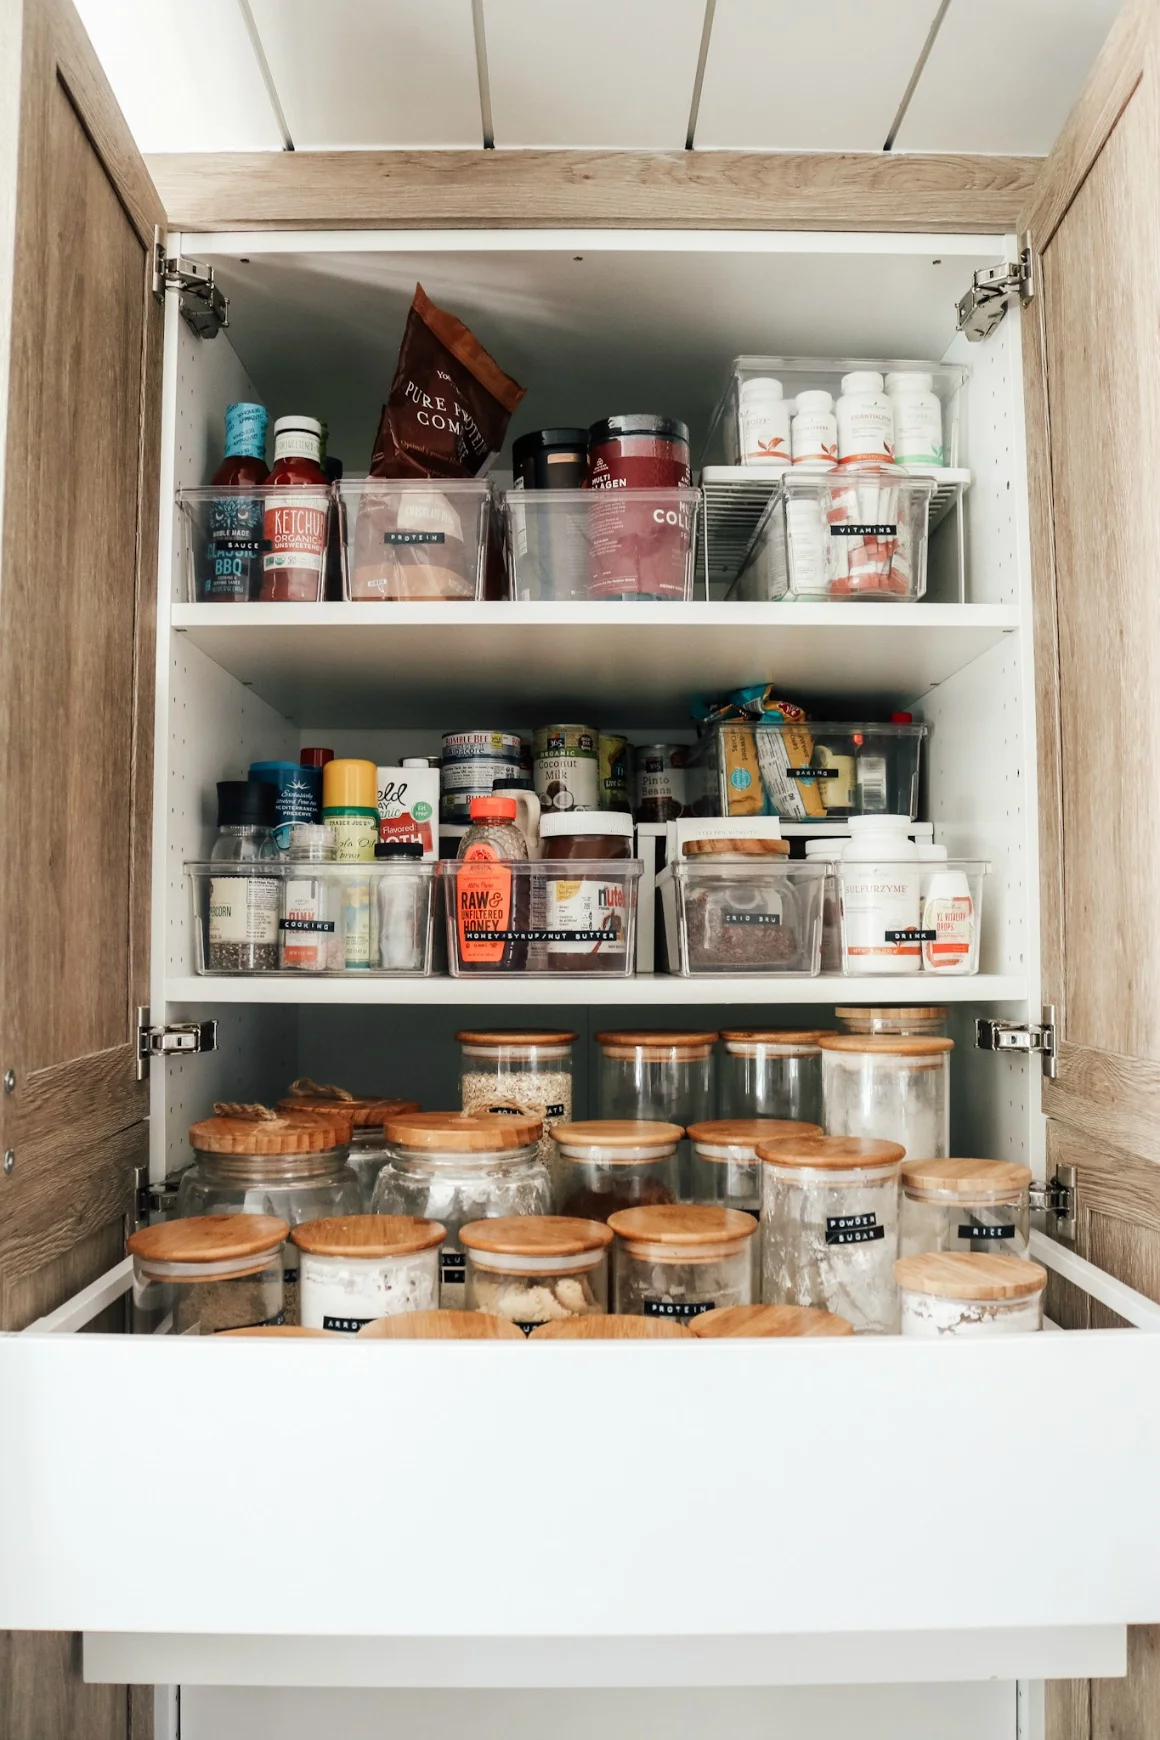
Accessibility also improves since clear containers often feature designs optimized for easy opening and stacking. They prevent clutter from building up and help you maintain a clean and organized kitchen environment, making your cooking experience more enjoyable and less stressful.
Material Types and Durability
When selecting clear containers, consider materials like BPA-free plastic, glass, or acrylic. Plastic containers are lightweight and less prone to breakage, ideal for everyday use in a bustling kitchen. Glass options offer durability and a premium feel but require more cautious handling. For instance, families with young children may prefer plastic to avoid accidental shattering.
Durability matters because your containers will be regularly opened, cleaned, and rearranged. Investing in sturdy options ensures that your organization system lasts and doesn’t become a source of frustration due to frequent replacements.
Environmental Impact and Sustainability Considerations
Choosing eco-friendly containers contributes to a sustainable kitchen practice. Glass containers are recyclable and typically last longer, reducing waste over time. If using plastic, seek BPA-free and recyclable options to minimize environmental effects. Additionally, reusing containers and avoiding single-use packaging supports a greener lifestyle.
In one family’s story, switching to glass containers not only helped with organizing but also encouraged everyone to reduce disposable product usage, reinforcing positive habits beyond kitchen management.
Planning Your Kitchen Cabinet Layout
Assessing Cabinet Space and Usage
Before diving into the organization, take time to evaluate how you use your cabinet space daily. Consider which cabinets are easiest to reach and most frequently accessed. For example, pots and pans stored near the stove can streamline cooking, while snack items might be better off placed where kids can safely grab them.
Assess the depth, height, and number of shelves to understand what fits best. This upfront analysis prevents overcrowding and ensures each container has a dedicated spot that complements your kitchen workflow.
Creating Zones for Different Food Categories
Assigning zones within your cabinets based on food categories encourages efficiency. One zone might be dedicated to baking supplies like flour, sugar, and baking powder, while another contains snacks or cereal. This method aligns with natural cooking habits and helps maintain order over time.
For instance, placing prep items such as spices and mixing bowls near counters where you usually chop or mix ingredients avoids unnecessary walking back and forth, making cooking more enjoyable and less cumbersome.
Measuring Containers and Cabinet Dimensions
Accurate measurements are essential to avoid purchasing containers that don’t fit. Measure the height, width, and depth of your shelves and compare it against container sizes. This practice eliminates guesswork and allows you to maximize every inch of space.
One homeowner shared how precise measuring helped them discover that smaller stackable containers were perfect for narrow shelves, while larger bins suited deeper cabinets, leading to an optimized layout tailored to their kitchen’s unique constraints.
Selecting the Right Clear Containers
Size Variety for Multitasking
A one-size-fits-all approach rarely works in kitchen organization. Having containers in multiple sizes accommodates diverse pantry items, from tiny spice jars to bulk pasta or baking ingredients. This flexibility means each container can be matched to the specific food item, reducing wasted space.
For example, a baker might use small containers for baking soda and vanilla extract while reserving large airtight bins for flour and sugar, creating a multitasking setup that aligns with different cooking needs.
Choosing Airtight Features
Maintaining freshness is key, especially for perishables like nuts or grains. Containers with airtight seals protect contents from moisture, pests, and air exposure, extending shelf life. Consider locking lids, silicone seals, or snap closures for maximum protection.
In one household, shifting to airtight containers prevented flour from hardening and eliminated the need to transfer items frequently, saving time and reducing waste.
Labels and Customization Options
Labels play a pivotal role in a well-organized kitchen. Utilize writable labels or pre-printed stickers on containers for at-a-glance identification. Some clear containers come with customizable labeling spots or chalkboard surfaces for easy updates.
A chef friend of mine uses color-coded labels to differentiate between spices and baking ingredients, making it easier to locate items, especially during busy meal prep sessions.
Preparing and Cleaning Your Kitchen Cabinets
Emptying Cabinets Completely
Before organizing, clear out all contents from your cabinets. This step allows you to evaluate what you have, discard expired or unused items, and clean the space thoroughly. One couple found several expired spices and unused gadgets during this step, freeing up valuable storage space.
Deep Cleaning and Maintenance Tips
Wipe down shelves with a mild cleaner or vinegar solution to remove grime, crumbs, and potential allergens. Dry completely before placing containers back to avoid moisture buildup, which can spoil food. Adding shelf liners can protect surfaces and simplify future cleaning.
Maintaining cleanliness along with organization fosters a healthy kitchen environment and enhances the lifespan of your cabinets and containers.
Step-by-Step Process to Organize with Clear Containers
Sorting Pantry Items by Category
Begin by grouping similar items like grains, snacks, baking ingredients, and spices. This sorting process helps clarify what containers you’ll need and aligns with the zones you planned earlier. For instance, all types of pasta together, baking soda near sugar, and snacks in one section.
Filling and Sealing Containers Correctly
Transfer items into containers carefully to avoid spills. Fill each container fully but leave some space to allow for lid closure. Seal containers tightly to preserve freshness and prevent pests. During this step, some people find weighing or measuring items helpful for precise portion control.
Arranging Containers for Optimal Accessibility
Place frequently used containers at eye level or front of shelves, and lesser-used items towards the back or higher shelves. Stack containers thoughtfully to prevent tipping or obstructing access. For example, snack bins can be positioned lower for easy kid access, while bulk baking supplies are shelved higher.
Labeling Containers for Quick Identification
Apply labels consistently and clearly on each container’s front or lid. This habit accelerates your search for ingredients and reminds family members where items belong, fostering shared responsibility in maintaining order.
Maintenance Tips for Long-Term Organization
Regular Inventory Checks
Schedule monthly or quarterly inventory reviews to identify low supplies or expired goods. This practice avoids last-minute grocery runs and ensures your kitchen remains stocked according to your cooking habits. It also keeps your organization intact by preventing overstocking and clutter.
Seasonal Cleaning and Reorganization Tips
Twice a year, consider emptying cabinets, deep cleaning, and reassessing your system. Tastes and cooking routines may change, so updating containers or zones keeps the setup practical. A seasonal refresh also combats dust buildup and reassures that your kitchen stays efficient and welcoming.
Additional Ideas to Maximize Kitchen Cabinet Space
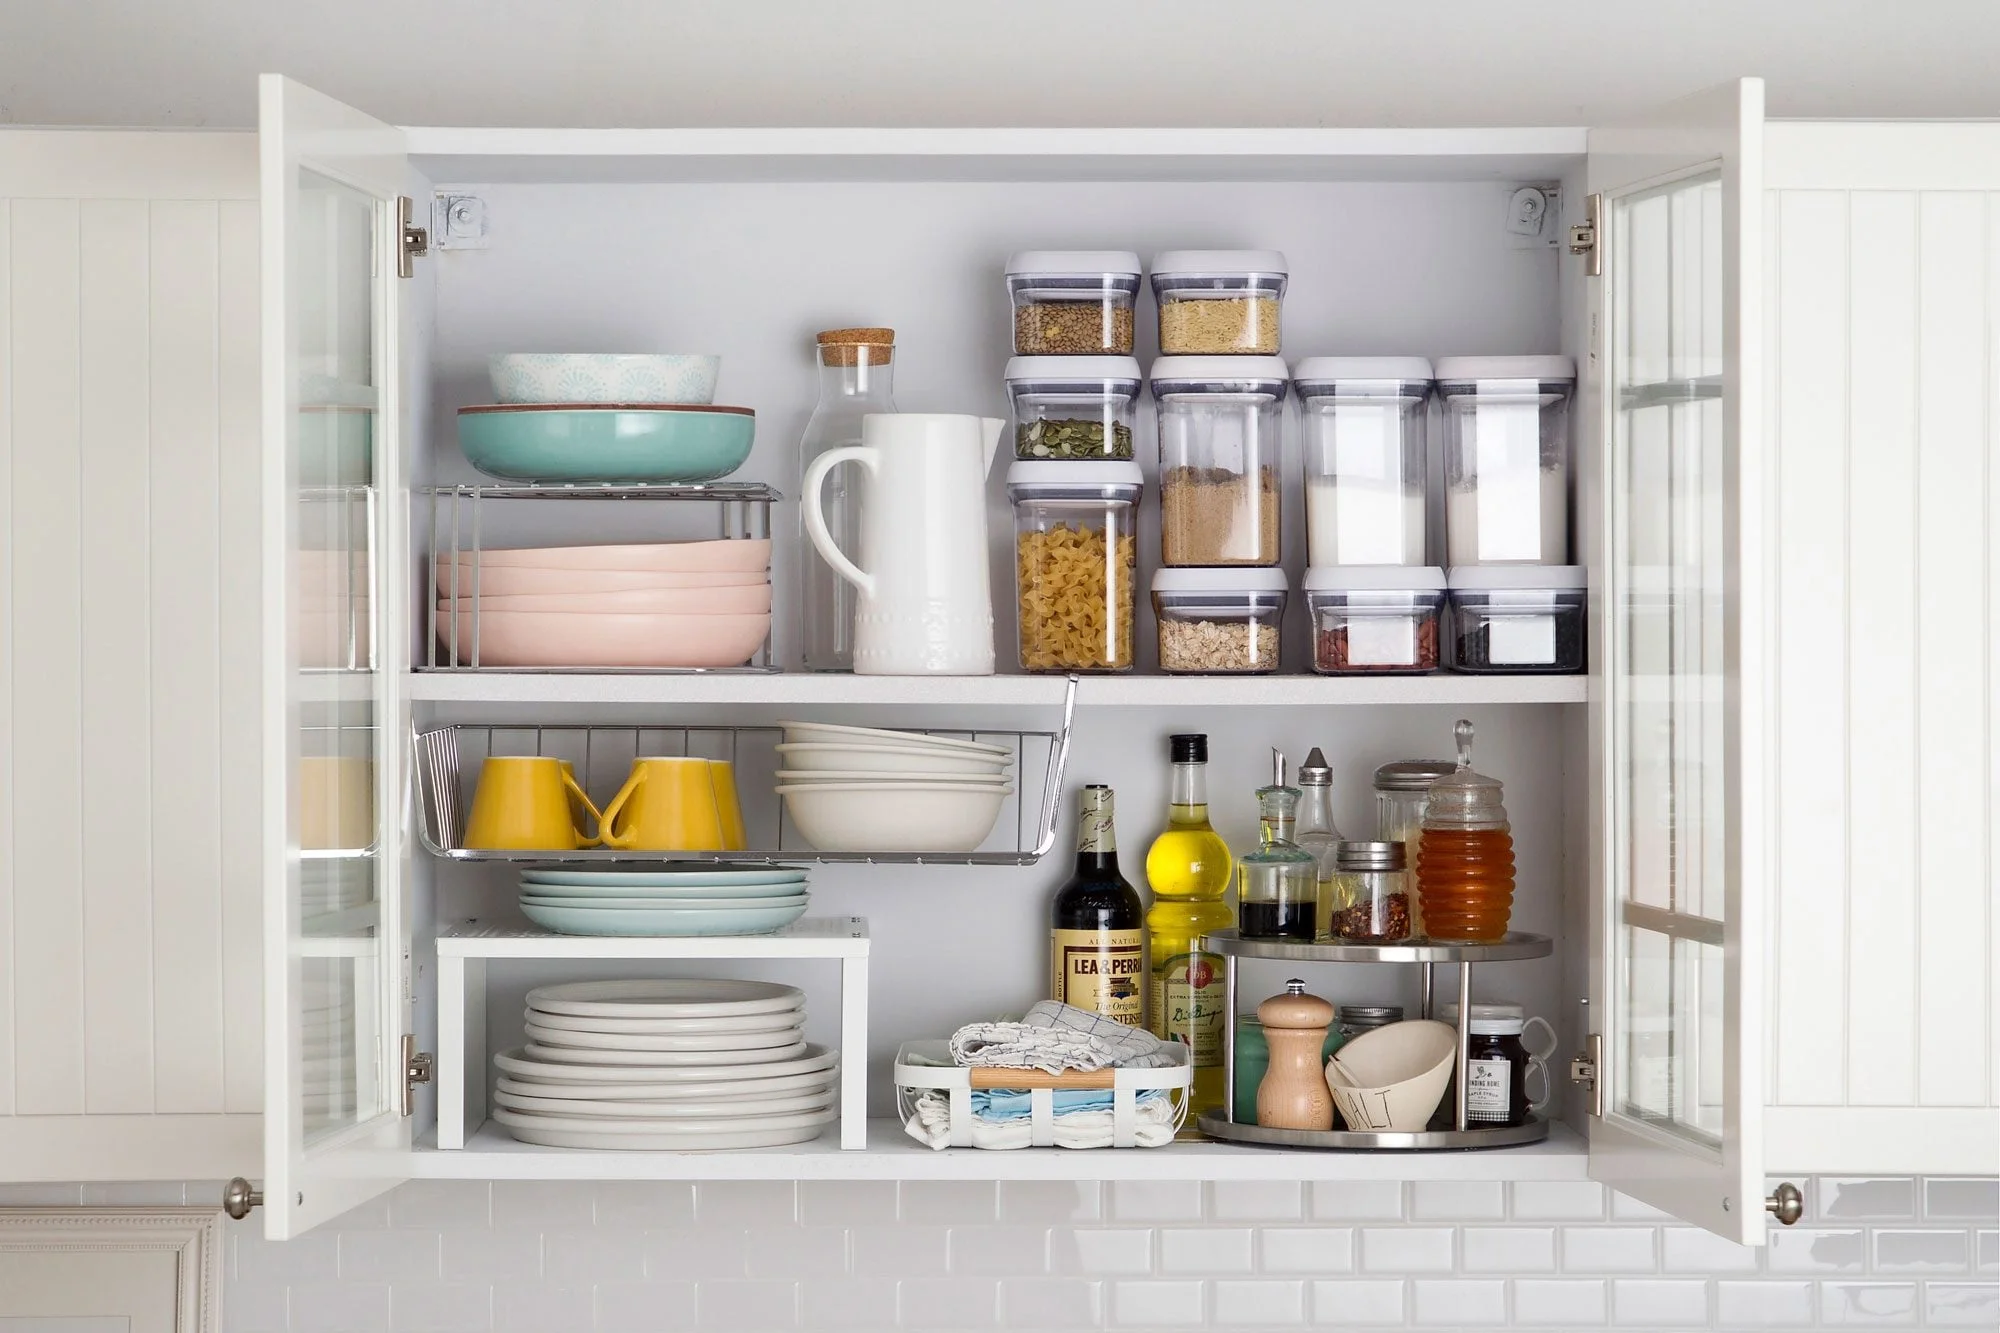
Using Risers and Shelf Dividers
Risers help create vertical layers in your cabinets, allowing you to stack containers without losing visibility or access. Shelf dividers keep stacks neat and prevent tipping, especially for plates or cutting boards. For example, a riser placed inside a cabinet doubled the storage space for snacks, making use of vertical voids.
Incorporating Stackable Containers
Stackable containers are designed to nest securely, saving space and creating a uniform look. They are particularly useful in small kitchens, where maximizing every inch matters. One chef used stackable clear containers for spices, fitting dozens in a shallow drawer and freeing cabinet space for larger items.
Conclusion: Enjoying a Clutter-Free Kitchen
Organizing kitchen cabinets with clear containers transforms a hectic cooking space into a harmonious, efficient area. By planning zones, selecting suitable containers, and maintaining the system regularly, you’ll save time and reduce stress during meal prep. Clear containers not only reveal what you have at a glance but also inspire better cooking habits and family involvement. Embrace this step-by-step guide, and enjoy the satisfaction of a tidy, clutter-free kitchen that supports your daily routines effortlessly.


 | SAM THE COOKING GUY 4K")